
-
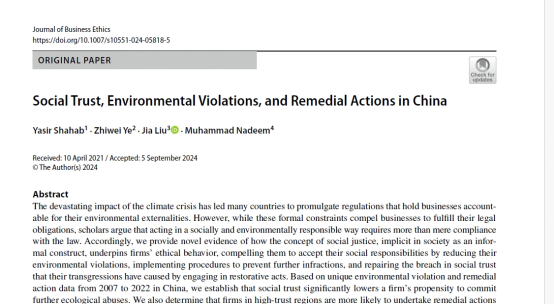
维多利亚网站3308教师发表FT50期刊论文
近日,维多利亚网站3308Yasir Shahab博士在FT50排名的期刊《Journal of Business Ethics》上发表了标题为《Social Trust, Environmental Violations, and Remedial Actions in China》的文章。这是Yasir Shahab博士在2021...
11/15
2024 -
会计学子获2024年全国高校商业精英...
11月10日,由全国高校商业精英挑战赛委员会指导,中国贸促会商业行业委员会、中国国际商会商业行业商会、中国商业经济学会主办,中国贸促会商业行业委员会教育培训部承办的2024年全国高校商业精英挑战赛创新创业...
11/11
2024 -
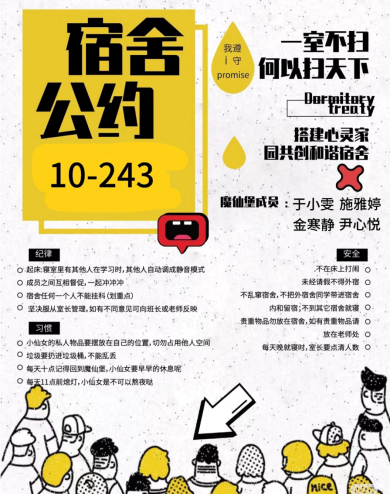
我院24级新生宿舍公约制定活动
为营造良好的宿舍生活环境,构建和谐的宿舍人际关系,我院24级新生开展了宿舍公约制定活动。活动伊始,各宿舍成员积极参与讨论,大家各抒己见,围绕作息时间、卫生清洁、安全用电、室友相处等方面提...
11/06
2024
-
关于我院2024年下半年团员发展建议...
根据共青团陕西省教育工作委员会《关于做好2024年发展团员工作的通知》、院团字〔2024〕41号《关于开展西京学院2024年下半年团员发展工作的通知》的文件要求,经过个人申请、基层团支部推荐、院团委材料审查等环...
10/16
2024 -
关于开设《会计研究方法论》课程集训班...
全院师生:为进一步提升我院师生的科学素养和学术水平,学院特邀悉尼新南威尔士州麦考瑞大学商学院姜海燕博士来我校讲授《会计研究方法论》课程,授课时间为10月14—18日,每晚19:00-23:00,授课地点在2328教室,...
10/14
2024 -
关于遴选我院参加第九届定向越野比赛队...
各班级:根据《关于举行“立于三十 志在千里”西京学院第九届校园定向越野赛的通知》,现将我院遴选队员事项通知如下:一、参与人员维多利亚网站3308全体学生二、校赛时间、地点时间:2024年10月17日16:00-18:30地点:...
09/27
2024 -
04/09
2024 -
VCASE中国财经案例数据库试用公告
一、平台注册方式1、登录网址:请在电脑浏览器地址栏处输入https://vcase.pub/ 2、用户注册:2.1进入网站后,点击页面右侧的注册按钮 2.2点击后在新页面处填写个人信息,填写完成后勾选下方“我已阅读”复选框...
04/02
2024 -
维多利亚网站3308关于举办2022、2023年校级大创...
维多利亚网站3308师生:为了进一步推动维多利亚网站3308创新创业教育,激发广大学生的创新精神和创业热情,展示2023届大学生创新创业项目的成果,学院定于4月2日(星期二)下午14:30在2301多媒体教室举办2022、2023年校级大学生创...
03/29
2024